I first met Susan Cleveland in the Pfaff booth at the Houston Quilt Festival, several years ago. She was easy to spot, as she was wearing a sparkly stars headband. You know what I’m talking about, the stars are on springs and they stick up from the headband. She was fun, energetic, friendly, and she had one of her quilts on display. Everything about the personality of that quilt, resonated with the funny lady standing there with stars bouncing off of her head! I was fascinated with how the quilt was embellished and how Susan had put in a perfect, tiny piping in various places on her quilt. That’s when I first learned about, and bought the kit for, Piping Hot Binding. After returning home from the show, I promptly put the kit away and lost it. Just so you know, that happens to me a lot! I blame it on the ADD.
Fast forward to last week, when I was on the Bakersfield Modern Quilt Guild’s schedule to demonstrate how to make Piping Hot Binding. You see, this is how I make myself learn new things….I volunteer to teach them. Yes, I make myself crazy! The day before the meeting, I watched the YouTube videos that Susan had posted, and I realized that this was going to be very easy, using her tool, and a fun way to add some zing to a quilt! (There are two videos. You need to watch both of them.) I prepped some supplies, and the hands-on tutorial at our meeting went off without a hitch! Everyone loved it! Since I was an old pro at it now, I decided to add piping to my quilt that is ready for binding.
My first step was to figure out how much piping needed to be made. The quilt isn’t huge, but it’s a robust lap size. I determined that I needed to make 9 yards of piping. That’s a lot of piping to manage! The casing was prepared that same way binding is. The first and most important thing to do with the piping cording, is to pre-shrink it with a steam iron. After measuring out 9 yards and getting it all pre-shrunk, I knew better than to have that much cording laying in the floor. Remember, I have a quilting kitty. I also didn’t want to cut the cording in case I’d mis-measured. So, this is the somewhat brilliant idea (so says me) I came up with to manage all of that cording. First, I needed a way to mark the 9 yard point.
I used a very small safety pin to mark my spot, then rolled it all back onto the spool. I need a way to manage the spool so that the cording fed freely off of it, but was somewhat controlled.
I used a ball chain from a necklace and ran it through the cording spool. (No comments about the Okie tan, thank you. lol) As you can see, the thread is coming off the spool from underneath. This allowed it to feed smoothly, without being unruly.
A very small dot of Roxanne’s Glue Baste helped to keep the cording snug in the crease of the casing. Roxanne’s is water soluble, so it will wash out of the quilt. If you are doing this on a wallhanging that will not be washed, just be very light handed with the glue.
I discovered the piping foot for my Bernina, and I swear that the Heavens opened up and sang! When I prepared the demo piece for the class, I used both the zipper foot, and the open-toe foot. They did a dandy job, but this piping foot is to die for!
Tape down a small stack of post-it-notes to help you evenly guide the piping through the stitching process. I also used the Purple Thang to make sure my cording was nice and snug in the fold of the casing.
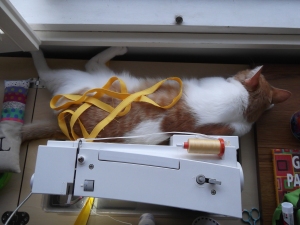
This is how I handled the piping as it accumulated. Shamus is always so helpful! Just in case you worry about me catching his tail under the needle, notice the tail weight/pin cushion. I’m all for using multi-purpose tools!
Supervising in the sewing room is exhausting! I took a nap myself, but I hid the camera from Shamus! 😉
If you want to learn how to add Piping Hot Binding to your projects, visit Susan Cleveland’s website, Pieces be With You, and watch her awesome YouTube videos. Our local quilt shop, Bolts to Binding, has PHB kits in stock.


The piping tute is great, but I LOVE the Tail weight/pin cushion…boy do I need that x 2!!!
Oh, no, I bought this kit a couple of years ago. Yep, still haven’t used it.
Until now that is. You’ve inspired me to get it out and use it.
Thankx for the links to Susan’s vids.
Too bad I couldn’t see your demo.
Bet it was great!!!!!
hugs
Get out that kit and have some fun! 🙂
Love the new blog…. and to think I knew you when (you didn’t like kitty’s!)….. Miss ya!
B
I know! Danged cats! LOL! I miss you, too! xoxo